 |
| Cut and eat me! |
<update Dec '13> SUCCESS! I have made this cake successfully after more experience with baking sponge cakes so I would like share a few more tips here...
1. Overbake!! - My oven is one of the cheapest models out there and that means that it's not the best equipment for baking. So if I can make this work, so can you :) If you find your cake very moist (toothpick test comes out very wet), bake for a longer time with a slightly higher temperature. If the tops are browning too fast, cover with a sheet of aluminium foil
2. Understanding your kitchen/baking ware - Search for this recipe and you will find many many variations. And if you are an amateur baker, chances are you will follow a famous food blogger recipe to a T. My advice is don't.
Recipes should be adapted to your oven and baking equipment. I know for one that my oven is wonky and that means I have to bake my cakes for a longer time. I have minimal baking equipment - a 8-inch round cake pan with removable base and 7 inch square mould with no base. All my recipes are thus tailored for that sizing. An 8 inch cake pan will usually fit "4 eggs worth" recipes - any more, there will be overflow. This cotton cheesecake recipe is like the basic sponge cake recipe I always use, just replacing oil with butter and adding cream cheese. Using comparative measures, you get a recipe that fits you the best. It is good to spend some time experimenting with your oven and equipment.
3. Water bath - Hot or room temperature water? I have used both and found no significant difference so to save time and energy, use room temperature tap water
4. When is the cake ready? I go by toothpick test - if there are minimal crumbs clinging onto the stick, it is done. The cake should to be chilled for a few hours before cutting. You will then get a smooth velvety texture.
5. Cooling - Once the cake is done, leave it to cool in the oven with the door ajar
5 easy tips to help you succeed at this cake! I learnt from my mistakes and I hope you can learn from mine so you can succeed on your first try!
(and now back to my original post...)
---
My cheesecake turned out a little too moist/wet for my liking and I had to freeze it for a couple of hours before I could get cut it. I guess my oven doesn't work too well when it comes to baking whole cakes, will have to adjust the temperature next time. Despite the lack of lightness which I was so looking forward to, the taste of cream cheese was just right and a nice treat. Not bad for my first attempt at baking cheesecakes.
I followed closely to Ju's (thelittleteochew) recipe. Check out her recipe and you will find her tips really useful!
Tips
Melting the cream cheese, butter and milk in a double broiler is actually very easy. For those who do not know what a double broiler is, it is essentially creating steam to melt your ingredients which do not come in direct contact with fire. Take a saucepan and fill it about 1/3 full with water and bring it to a boil. Place a metal bowl, containing the ingredients you want to melt, on top of the saucepan. The metal bowl should balance nicely on top of the saucepan (important as you have to whisk/stir your mixture). I use a ceramic saucepan (CorningWare) to boil the water, and use a metal plate with sides. Using a metal bowl will help to absorb the steam produced by the boiling water quickly and heat up easily, enabling the ingredients to melt faster. This method is also used for melting chocolate and in the making of swiss meringue buttercream or pastry cream.
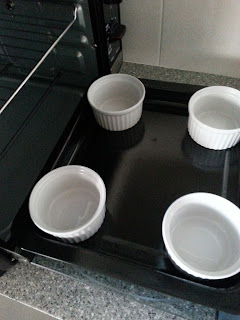
Most cheesecakes have to be baked in a water bath; i.e. placing the cake mould onto a tray of water. However, this might cause water to seep into your cake and ruin your hard work. Ju devised of a smart way around it by placing tart moulds at the four corners of the pan below your actual cake rack. I followed suit, but because I did not have tart moulds at home, I substituted them with Ramekins (mini ceramic pots used to make molten chocolate cakes). I got my set of four from Phoon Huat for under $10). Refer to my water bath setup below.


No comments:
Post a Comment